Introduction
Applying realistic textures is a crucial aspect of architectural visualization, but it can be a time-consuming and often tricky task. The Architexture plugin for SketchUp simplifies this process by allowing users to quickly generate customizable, seamless textures, perfect for architectural designs. In this post, we’ll explore the features of the Architexture plugin and why it’s a must-have for architects and designers who want to elevate the realism of their models.

What is the Architexture Plugin?
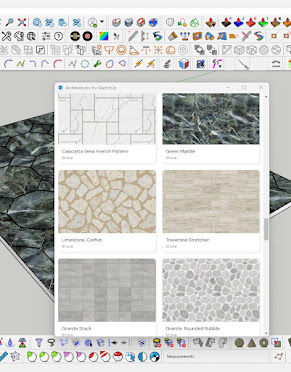
The Architexture plugin is a texture generation tool specifically designed for architectural modeling in SketchUp. It allows users to create detailed and seamless textures, such as bricks, tiles, stones, and paving, with just a few clicks. You can define specific dimensions, colors, and patterns to match the style of your project, ensuring that your model looks realistic and professional.
Key Features of the Architexture Plugin
-Customizable Patterns: Choose from a wide range of patterns, including bricks, tiles, stone, and pavers, and customize their size, spacing, and alignment to match your design needs.
- Seamless Textures: The plugin automatically generates seamless textures, ensuring that there are no visible edges or repetitions in your models.
- Easy Material Assignment: Once a texture is generated, you can easily apply it to your model’s surfaces, making it quick to update the appearance of walls, floors, or exterior facades.
- Realistic Detailing: Architexture allows you to add depth to your textures by adjusting shadow effects, grout size, and color variations, resulting in highly realistic surface finishes.
- Fast and Efficient: Generate and apply textures in a fraction of the time it would take to create them manually, speeding up your workflow without sacrificing quality.
How to Use the Architexture Plugin
1. Installation: Download and install the Architexture plugin from the SketchUp Extension Warehouse or other trusted sources.
2. Select a Pattern: Choose the type of texture you want to generate, whether it’s brick, tile, or stone, and set the dimensions and spacing.
3. Customize the Appearance: Adjust the color, texture, and grout settings to match your design’s aesthetic.
4. Apply to Surfaces: Once your texture is generated, apply it to any surface in your model with just a few clicks.
5. Refine as Needed: Modify texture settings if necessary, and watch your architectural model come to life with realistic, professional-quality textures.
Applications of Architexture in Design
- Exterior Facades: Quickly create brick or stone textures for building exteriors, ensuring that your design accurately reflects the final material finish.
- Interior Walls: Generate tile or stone textures for interior walls, such as kitchens or bathrooms, for realistic and detailed visualizations.
- Flooring: Use the plugin to create detailed floor textures, from hardwood planks to tiled surfaces, enhancing the realism of your architectural models.
- Landscape Design: Apply textures to outdoor surfaces like pathways, patios, or pavers, ensuring cohesive and realistic landscaping in your projects.


.png)

No comments:
Post a Comment
Note: only a member of this blog may post a comment.