Friday, 27 September 2024

SKETCHUP FREE PLUGIN - EXTRUDE TOOL

Introduction

Creating complex 3D shapes in SketchUp often requires more than the standard set of tools. While SketchUp’s native push-pull tool is great for basic extrusions, when it comes to modeling curved surfaces, intricate patterns, or detailed geometry, it can feel limiting. This is where the Extrude Tools plugin comes to the rescue. Developed by TIG, Extrude Tools is a set of powerful, user-friendly tools that allow for advanced extrusion techniques that go beyond the basics.

In this post, we’ll explore how the Extrude Tools plugin works, its most useful features, and why it’s a must-have for anyone serious about creating complex 3D models in SketchUp.


What is the Extrude Tools Plugin?

The Extrude Tools plugin is a collection of SketchUp extensions that enable users to perform a variety of advanced extrusion operations. From creating complex lofted surfaces to extruding along curves or even joining surfaces, this plugin offers a wide range of functionality that significantly expands SketchUp’s modeling capabilities.

Key Features of Extrude Tools

- Extrude Edges by Rails: This tool allows you to create complex, lofted surfaces by extruding an edge along two or more guide rails. It’s perfect for modeling organic shapes like curved roofs, bridges, or flowing architecture.

- Extrude by Lathe: Similar to the lathe function in other 3D modeling software, this tool helps you rotate a profile around an axis, ideal for creating objects like columns, vases, or circular architectural elements.

-Extrude Along Vector: Extrude shapes in a specific direction using a vector, allowing for controlled, non-uniform extrusion in any direction.

-Extrude Edges by Faces: Allows for the extrusion of multiple faces along paths, useful for creating intricate geometry and repeated patterns.

- Join Push-Pull: A more advanced version of the native push-pull tool, this allows for the simultaneous extrusion of multiple faces with better control over the resulting shape.

- Create Faces from Edges: Automatically generate surfaces from a network of edges, making it easier to close gaps and create continuous surfaces from complex wireframes.

CLICK TO DOWNLOAD PLUGIN HERE

How to Use the Extrude Tools Plugin

1.Install the Plugin: Download and install the Extrude Tools plugin from the SketchUp Extension Warehouse or SketchUcation.

2. Choose the Desired Extrusion Tool: Depending on the complexity of your model, select one of the many extrusion options available.

3. Select Geometry: Choose the edges, faces, or curves you want to extrude. The tool allows for precise selection and manipulation.

4. Define Parameters: Adjust parameters like extrusion length, direction, and guide rails to create the desired shape.

5. Apply the Extrusion: Watch as the plugin generates complex 3D geometry in seconds, allowing for further refinement and adjustments as needed.

Applications of Extrude Tools in Architectural Design

-Complex Roof Structures: Use the Extrude Edges by Rails tool to model complex roof designs that involve curved or lofted surfaces.

- Furniture and Product Design: Easily model intricate details, such as curved chairs, custom vases, or organic forms that would be difficult to create using standard tools.

- Bridges and Infrastructure: Create detailed, flowing structures by extruding profiles along multiple rails, perfect for bridges or curved architectural elements.

Why Extrude Tools is Essential for SketchUp Users

- Efficiency: By automating complex extrusions, the plugin saves significant time in the design process, enabling users to create intricate models with minimal effort.

- Ease of Use: Despite its advanced functionality, the Extrude Tools plugin is user-friendly and accessible to beginners, while still offering the depth of control that professionals need.

Sunday, 15 September 2024

SKETCHUP FREE PLUGIN - Scale By Tool Plugin

Introduction

Scaling objects in SketchUp is a fundamental part of the design process, whether you're adjusting the size of architectural elements, furniture, or other 3D components. However, the native scaling tool can be limiting when you need precise control or non-uniform scaling options. Enter the Scale By Tool plugin for SketchUp—a powerful extension that allows for more controlled, accurate scaling based on specific dimensions or custom inputs.

In this blog post, we’ll explore the features of the Scale By Tool plugin, how it can improve your workflow, and why it's an essential tool for any SketchUp user looking to achieve precise scaling.


CLICK TO DOWNLOAD PLUGIN

What is the Scale By Tool Plugin?

The Scale By Tool plugin is an extension for SketchUp that provides enhanced scaling capabilities compared to the native tool. With it, you can scale objects or groups by exact dimensions, percentages, or even non-uniformly in specific directions. This plugin is ideal for architects, designers, and 3D modelers who need fine control over the resizing of objects within their projects.

Key Features of the Scale By Tool Plugin

  • Precise Scaling by Dimension: Scale objects to exact dimensions, allowing you to resize models to fit specific design requirements or constraints.
  • Non-Uniform Scaling: Scale objects differently along the X, Y, and Z axes, which is especially useful when working with irregular shapes or adjusting proportions.
  • Percentage-Based Scaling: Quickly resize components or groups by inputting a specific percentage, perfect for when you need relative changes in size.
  • Custom Scaling Planes: The plugin allows you to define custom planes for scaling, providing flexibility when working with complex or angled geometry.
  • User-Friendly Interface: The intuitive interface ensures that even users who are new to the plugin can easily navigate and apply precise scaling adjustments.

How to Use the Scale By Tool Plugin

  1. Installation: Download and install the Scale By Tool plugin from the SketchUp Extension Warehouse or another trusted source.
  2. Select the Object: Choose the component, group, or object you want to scale within your model.
  3. Activate Scale By Tool: Open the plugin and select your preferred scaling method—by dimension, percentage, or plane.
  4. Input Dimensions: Enter the exact measurements or scaling percentages you want to apply to the object. The plugin will resize the object accordingly.
  5. Apply Scaling: Click apply, and the object will be scaled according to your settings. You can further refine the scale if necessary.

Ready to take your scaling game to the next level? Try the Scale By Tool plugin today and experience the difference! Don’t forget to share your experience in the comments below and subscribe for more insights on SketchUp plugins and 3D modeling techniques!

Saturday, 14 September 2024

sketchup must have plugin -Curic Face Knife for SketchUp

 Introduction


Creating precise cuts in your 3D models can be a challenge, especially when dealing with complex geometries. The Curic Face Knife extension for SketchUp simplifies this process by providing an intuitive, efficient tool for cutting and slicing faces within your model. Whether you're working on architectural designs, product models, or detailed 3D objects, Curic Face Knife allows you to make accurate cuts with ease. In this post, we’ll dive into the features of this powerful plugin and how it can enhance your modeling workflow.

What is Curic Face Knife?

Curic Face Knife is a SketchUp extension that enables users to easily cut and divide faces within their 3D models. Unlike traditional methods that require multiple steps, this plugin simplifies the cutting process by allowing you to draw cutting lines directly on a surface, making clean, precise cuts in just a few clicks. It’s a versatile tool that helps improve efficiency when working on detailed models.

Key Features of Curic Face Knife

  • Draw and Cut: Simply draw a line across any face or surface, and the plugin will automatically cut along that path, making it easy to divide faces precisely.
  • Multiple Face Support: Curic Face Knife allows you to cut through multiple faces simultaneously, saving time when working on larger or more complex surfaces.
  • Quick Cleanup: Automatically cleans up leftover geometry after cutting, leaving behind only the necessary edges and faces for a clean and organized model.
  • Angle and Offset Cutting: Perform cuts at specific angles or with defined offsets, giving you more control over how you modify your 3D model.
  • Works with Groups and Components: Easily cut through faces within groups and components without having to explode or ungroup them, maintaining your model’s structure.

CLICK TO DOWNLOAD THIS PLUGIN

How to Use Curic Face Knife

  1. Installation: Install the Curic Face Knife plugin from the SketchUp Extension Warehouse or other trusted sources.
  2. Select the Surface: Choose the face or group of faces that you want to cut.
  3. Draw the Cut Line: Use the tool to draw a line across the face where you want to make the cut. You can also use predefined guidelines for more precise cuts.
  4. Execute the Cut: Once your line is in place, the plugin will cut the face along the path, dividing it cleanly.
  5. Clean Up: The plugin automatically cleans up unnecessary edges or geometry, leaving behind a tidy model.

Why Curic Face Knife is a Must-Have for SketchUp Users

  • Efficiency: Simplifies complex cutting tasks, saving you time and effort when modifying surfaces in your models.
  • Precision: Allows for highly accurate cuts, ensuring your designs maintain professional-quality standards.
  • Versatility: Works with a variety of surfaces, from flat faces to more complex geometries, making it suitable for many different types of projects.
  • User-Friendly: With an intuitive interface and straightforward functionality, even beginners can start using Curic Face Knife right away.

Have you tried the Curic Face Knife plugin in your SketchUp projects? Let us know how it’s improved your workflow in the comments below. And don’t forget to subscribe for more SketchUp tips, plugin reviews, and design insights!

Friday, 13 September 2024

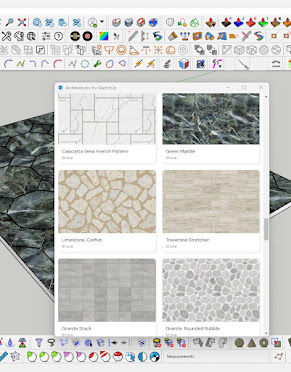
FREE PLUGIN FOR TEXTURE IN SKETCHUP - Architexture Plugin

Introduction

Applying realistic textures is a crucial aspect of architectural visualization, but it can be a time-consuming and often tricky task. The Architexture plugin for SketchUp simplifies this process by allowing users to quickly generate customizable, seamless textures, perfect for architectural designs. In this post, we’ll explore the features of the Architexture plugin and why it’s a must-have for architects and designers who want to elevate the realism of their models.


What is the Architexture Plugin?

The Architexture plugin is a texture generation tool specifically designed for architectural modeling in SketchUp. It allows users to create detailed and seamless textures, such as bricks, tiles, stones, and paving, with just a few clicks. You can define specific dimensions, colors, and patterns to match the style of your project, ensuring that your model looks realistic and professional.


Key Features of the Architexture Plugin

-Customizable Patterns: Choose from a wide range of patterns, including bricks, tiles, stone, and pavers, and customize their size, spacing, and alignment to match your design needs.

- Seamless Textures: The plugin automatically generates seamless textures, ensuring that there are no visible edges or repetitions in your models.

- Easy Material Assignment: Once a texture is generated, you can easily apply it to your model’s surfaces, making it quick to update the appearance of walls, floors, or exterior facades.

- Realistic Detailing: Architexture allows you to add depth to your textures by adjusting shadow effects, grout size, and color variations, resulting in highly realistic surface finishes.

- Fast and Efficient: Generate and apply textures in a fraction of the time it would take to create them manually, speeding up your workflow without sacrificing quality.


How to Use the Architexture Plugin

1. Installation: Download and install the Architexture plugin from the SketchUp Extension Warehouse or other trusted sources.

2. Select a Pattern: Choose the type of texture you want to generate, whether it’s brick, tile, or stone, and set the dimensions and spacing.

3. Customize the Appearance: Adjust the color, texture, and grout settings to match your design’s aesthetic.

4. Apply to Surfaces: Once your texture is generated, apply it to any surface in your model with just a few clicks.

5. Refine as Needed: Modify texture settings if necessary, and watch your architectural model come to life with realistic, professional-quality textures.


Applications of Architexture in Design

- Exterior Facades: Quickly create brick or stone textures for building exteriors, ensuring that your design accurately reflects the final material finish.

- Interior Walls: Generate tile or stone textures for interior walls, such as kitchens or bathrooms, for realistic and detailed visualizations.

- Flooring: Use the plugin to create detailed floor textures, from hardwood planks to tiled surfaces, enhancing the realism of your architectural models.

- Landscape Design: Apply textures to outdoor surfaces like pathways, patios, or pavers, ensuring cohesive and realistic landscaping in your projects.

CLICK TO DOWNLOAD PLUGIN


Have you used Architexture in your architectural projects? Share your experience in the comments below, and don’t forget to subscribe for more tips on SketchUp plugins, tutorials, and architectural design insights!

Thursday, 12 September 2024

Floor Generator Plugin for SketchUp - FREE SKETCHUP PLUGIN


Introduction

Designing detailed floor layouts in SketchUp can be a time-consuming task, especially when you need to create intricate patterns and realistic textures. Fortunately, the Floor Generator plugin simplifies this process by automating the creation of floor patterns, tiles, and wood planks with customizable options. In this blog post, we’ll dive into how the Floor Generator plugin works, its key features, and why it’s a game-changer for architects, interior designers, and 3D modelers.

What is the Floor Generator Plugin?

The Floor Generator plugin is a SketchUp extension designed to generate realistic floor patterns in just a few clicks. Whether you're working on hardwood, tiles, or any other flooring type, this plugin allows you to customize the size, shape, and layout of floor panels, saving you hours of manual work. It also gives you precise control over spacing, alignment, and the overall appearance of your floor designs.

Key Features of Floor Generator

- Automatic Tile and Plank Generation: The plugin automatically generates floor tiles, planks, or panels based on user-defined parameters like size, length, width, and spacing.
- Customizable Patterns: You can create different patterns such as herringbone, random, staggered, or grid, giving you flexibility for various design styles.
- Realistic Gaps and Offsets: Add realistic gaps between floorboards or tiles, and control offsets for staggered effects, making your designs look more authentic.
- Material Assignment: Easily apply materials and textures to the generated floor, ensuring that the floor matches the overall aesthetic of your 3D model.
- Easy Modifications: After generating the floor, you can make adjustments to individual tiles or planks, providing full control over your design without starting from scratch.

How to Use Floor Generator

1. Install the Plugin: Download and install the Floor Generator plugin from the Extension Warehouse or SketchUcation.
2. Set Parameters: Open the plugin and set your desired parameters, such as tile or plank size, pattern type, and spacing.
3. Generate the Floor: Once you’ve entered your settings, simply select the area where the floor will be placed, and the plugin will automatically generate the pattern.
4. Apply Materials: Use SketchUp’s material library to add textures like wood, tiles, or stone to the generated floor for a realistic finish.

Why Floor Generator is Essential for SketchUp Users

- Time-Saving: No more manually drawing each individual plank or tile—Floor Generator automates the process, significantly reducing design time.
- Precision: Ensure accurate and evenly spaced floors, helping you achieve a professional and realistic look in your 3D models.
- Customization: The plugin’s flexibility allows for endless customization, enabling you to create a wide range of flooring styles with ease.

 Have you tried the Floor Generator plugin? Share your experience or floor design tips in the comments below, and don’t forget to subscribe for more SketchUp tutorials, plugin reviews, and 3D modeling tips!

DOWNLOAD FLOOR GENERATOR PLUGIN 

Thursday, 5 September 2024

SKETCHUP FREE PLUGIN FOR TEXTURE

ARCHITECTURE PLUGIN 

Architexture is a SketchUp plugin designed to create custom textures and patterns for architectural surfaces, like walls, floors, and facades. It allows users to generate seamless textures with adjustable parameters for color, scale, and detail, enhancing the realism and accuracy of 3D models. Ideal for architects and designers, this plugin simplifies the process of applying detailed surface textures, saving time and improving visual quality.


CLICK TO DOWNLOAD PLUGIN

Wednesday, 4 September 2024

JHS PowerBar plugin for SketchUp 2024

 Introduction


When it comes to enhancing productivity and efficiency in SketchUp, having the right tools at your fingertips can make all the difference. The **JHS PowerBar** plugin is a powerful, all-in-one toolbar that compiles some of the most useful SketchUp tools and plugins into a single, easy-to-access interface. Developed by Cadman and Jim Hamilton, this plugin is a must-have for anyone looking to streamline their 3D modeling workflow. In this post, we’ll explore the features of JHS PowerBar, how it works, and why it’s an essential tool for SketchUp users.

*What is JHS PowerBar?

JHS PowerBar is a free SketchUp plugin that integrates a wide range of essential tools into one convenient toolbar. This plugin doesn’t introduce new tools but rather brings together some of the best and most frequently used plugins, scripts, and native SketchUp functions into a single, easy-to-access location. This makes it easier to find and use the tools you need without having to navigate through multiple menus.

CLICK HERE TO DOWNLOAD PLUGIN


*Key Features of JHS PowerBar

- Unified Toolbar : Combines numerous tools from different plugins into one toolbar, saving you time and effort in searching for the right tool.

- Customizable : While JHS PowerBar comes preloaded with many tools, it can be customized to include other plugins and scripts that you frequently use.

- Improved Workflow : By centralizing essential tools, the plugin helps to speed up your workflow, making it ideal for both beginners and advanced users.

- Wide Range of Tools : Includes tools for common tasks like scaling, rotating, and copying, as well as more advanced operations like terrain modeling, line simplification, and complex geometry creation.

CLICK HERE TO DOWNLOAD PLUGIN

*How to Use JHS PowerBar

Using JHS PowerBar is straightforward and intuitive, even for those new to SketchUp:

1.Installation : First, download and install the JHS PowerBar plugin from the SketchUcation Plugin Store or another trusted source. Once installed, the toolbar will appear in your SketchUp workspace.

2.Explore the Toolbar : Familiarize yourself with the toolbar’s layout. JHS PowerBar includes tools for drawing, editing, terrain modeling, and more. Hover over each icon to see a tooltip description of its function.

3.Customize the Toolbar : You can add or remove tools based on your preferences. If you have other plugins you frequently use, you can integrate them into JHS PowerBar to create a personalized, all-in-one toolbar.

4. Use the Tools : To use a tool, simply click on its icon in the JHS PowerBar. The plugin includes tools for basic operations like moving, scaling, and rotating, as well as more specialized functions like shape bending, terrain modeling, and volume calculation.

*Why JHS PowerBar is Essential for SketchUp Users

- Efficiency : Centralizes all the essential tools you need in one place, reducing the time spent searching through menus.

- Flexibility : Customizable to fit your specific workflow, allowing you to add tools and plugins that are most relevant to your projects.

- User-Friendly : Ideal for both beginners who need a streamlined set of tools and advanced users looking for a more efficient workflow.

*Have you tried JHS PowerBar in your projects? Share your experience and any tips in the comments below. Don’t forget to subscribe for more SketchUp tutorials, plugin reviews, and design tips!

Sunday, 1 September 2024

1001bit Tools Plugin for SketchUp - Free SketchUp Plugin

Introduction

For architects and designers, creating detailed architectural elements can be time-consuming, especially when working on complex structures. The 1001bit Tools plugin for SketchUp is designed to streamline this process by providing a suite of automated tools that make architectural modeling faster and more efficient. In this post, we’ll explore the features of 1001bit Tools, how it can enhance your workflow, and why it’s a valuable addition to any SketchUp user’s toolkit.

What is 1001bit Tools?

1001bit Tools is a powerful SketchUp plugin that offers over 70 different tools tailored specifically for architectural modeling. It automates the creation of common architectural features such as staircases, walls, windows, doors, roofs, and more. With 1001bit Tools, what used to take hours can now be done in just a few clicks, allowing you to focus on the creative aspects of your design.


CLICK TO DOWNLOAD PLUGIN

Key Features of 1001bit Tools

-Staircase Generator: Automatically create various types of staircases, including straight, spiral, and custom designs, with customizable dimensions and styles.

- Wall Creation: Generate walls with precise control over thickness, height, and layering, including features like automatic wall joins and openings for doors and windows.

- Roof Framing Tools: Quickly model complex roof structures with tools for creating rafters, trusses, beams, and other roof elements, ensuring accurate alignment and spacing.

- Door and Window Components: Insert customizable doors and windows into your model with ease, including options for different styles, sizes, and placements.

- 2D and 3D Trusses: Automatically create 2D and 3D trusses with detailed parameters, ideal for roof framing and structural modeling.

- Advanced Boolean Operations: Perform complex Boolean operations like cutting, joining, and intersecting multiple objects or components with precision.

- Parametric Tools: Adjust the parameters of created elements easily, allowing for quick modifications and updates to your design without starting from scratch.


  How to Use 1001bit Tools

Here’s a brief overview of how you can integrate 1001bit Tools into your SketchUp workflow:

1. Installation: Download and install 1001bit Tools from the SketchUp Extension Warehouse or another trusted source. Once installed, the tools will appear in a dedicated toolbar within SketchUp.

2. Explore the Tools: Start by familiarizing yourself with the different tools available. The plugin categorizes tools into groups such as walls, roofs, stairs, and openings, making it easy to find what you need.

3. Create Architectural Elements : Use the specific tools to generate architectural elements like walls, roofs, or staircases. Input your desired dimensions and parameters, and the plugin will automatically generate the component.

4. Modify as Needed : All elements created with 1001bit Tools are parametric, meaning you can easily adjust their properties after creation. This flexibility allows you to experiment with different design options quickly.

5. Combine with Native Tools : While 1001bit Tools automates many tasks, it works seamlessly with SketchUp’s native tools, allowing you to refine and customize elements further.

Applications of 1001bit Tools in Architectural Design

- Residential Design : Quickly model entire houses or residential complexes, including walls, roofs, doors, windows, and stairs.

- Commercial Projects : Use the plugin to create detailed models of commercial buildings, complete with complex roofing systems and structural elements.

- Interior Architecture : Design interior spaces efficiently, placing doors, windows, and staircases with precision and ease.

- Educational Models: Ideal for students and educators, 1001bit Tools simplifies the process of creating detailed architectural models, allowing for more focus on learning and design exploration.

CLICK TO DOWNLOAD PLUGIN

Why 1001bit Tools is a Must-Have for SketchUp Users

- Time-Saving: Automates repetitive tasks, drastically reducing the time needed to create detailed architectural models.

- Precision : Ensures accurate and consistent results, crucial for professional architectural projects.

- Ease of Use: Intuitive interface makes it accessible to both beginners and experienced users, with minimal learning curve.

- Versatility : Suitable for a wide range of architectural projects, from small residential designs to large commercial developments.

 Have you tried 1001bit Tools in your projects? Share your experiences and tips in the comments below. Don’t forget to subscribe for more SketchUp tutorials, plugin reviews, and architectural design insights!


Your Personal Architecture Assistant

SKETCHUP FREE PLUGIN - EXTRUDE TOOL

Introduction Creating complex 3D shapes in SketchUp often requires more than the standard set of tools. While SketchUp’s native push-pull to...