SketchUp has long been a favorite tool for architects, designers, and creatives who value its intuitive interface and versatile modeling capabilities. With the release of SketchUp 2025 on February 25, 2025, Trimble has once again raised the bar, introducing a suite of features that promise to enhance visualization, streamline workflows, and boost interoperability. Whether you’re a seasoned pro or just starting out, there’s something exciting in this update for everyone. Let’s dive into what’s new in SketchUp 2025 and how these features can transform the way you bring your ideas to life.
1. Photorealistic Materials: Realism at Your Fingertips

One of the standout additions in SketchUp 2025 is the introduction of native Photoreal Materials powered by physically-based rendering (PBR). Gone are the days when you’d need to rely heavily on external rendering plugins for lifelike textures. Now, you can apply smooth, rough, shiny, or metallic finishes directly within SketchUp and see them react to lighting in real time. These materials are drag-and-drop simple—select from the material tray, apply to your model, and adjust the scale as needed. They’re even UV-mapped automatically, though you can tweak them for precision.
What’s more, SketchUp 2025 lets you convert your existing classic swatches into PBR materials, breathing new life into old projects. The 3D Warehouse has also been stocked with over 200 curated Photoreal Materials, making it easier than ever to find high-quality options for your designs. Imagine showing a client a basketball court with a gleaming finish or a metallic facade that catches the light just right—all without leaving SketchUp.
2. Environments: Immersive Lighting and Context
Complementing the Photoreal Materials are the new Environments feature. You can now add 360-degree HDRI (High Dynamic Range Imaging) images—like skyboxes—to your models, serving as both a background and a light source. Upload your own (up to 8K resolution) or grab one from the 3D Warehouse. These environments interact with PBR materials through reflections and lighting, adding depth and realism to your scenes.
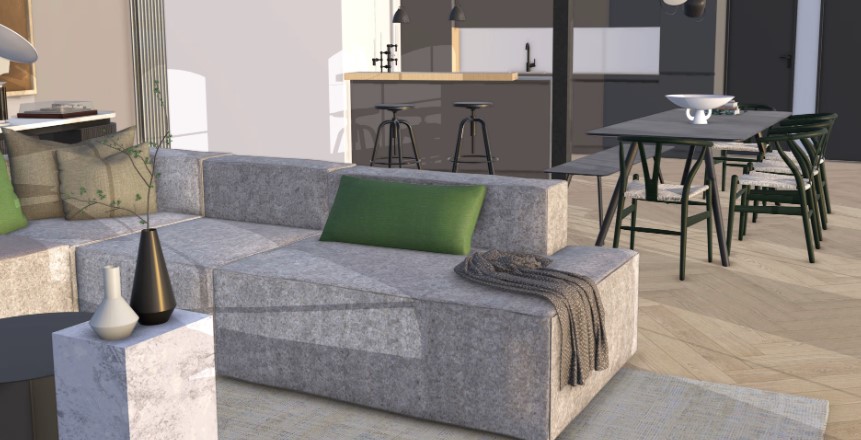
For example, picture designing a community center with a vibrant sky backdrop that illuminates the space naturally. Clients can feel the atmosphere of their project before it’s even built. Combined with the Ambient Occlusion feature from SketchUp 2024, this takes in-engine visualization to a whole new level.
3. Live Components Graduate from Labs
Live Components—pre-built, configurable objects—aren’t entirely new, but they’ve officially graduated from SketchUp Labs to a full production feature in 2025. With over 200 refreshed components available in the 3D Warehouse, you can tweak parameters like size, type, and material to fit your project perfectly. Need a custom roof truss or a modular furniture piece? Configure it in seconds and drop it into your model. This feature saves time and adds flexibility, especially for iterative design processes.

4. Enhanced LayOut: Smoother 3D-to-2D Transitions
LayOut, SketchUp’s 2D documentation tool, gets a significant upgrade in 2025. The core tools—Move, Scale, and Rotate—now mirror their SketchUp counterparts more closely, making the transition from 3D modeling to 2D drafting feel seamless. Plus, LayOut viewports can now display Environments, Photoreal Materials, and Ambient Occlusion alongside your models, ensuring visual consistency across your workflow.
For architects and designers, this means your presentation drawings and construction documents can reflect the same realism as your 3D renders. Update your model, and the changes flow effortlessly into LayOut—no more manual syncing headaches.
5. Improved IFC Interoperability: Collaboration Made Easy
SketchUp 2025 takes a big step forward in interoperability with enhanced IFC (Industry Foundation Classes) import capabilities. Importing IFC files is now faster and can reduce file sizes by up to 85%, according to Trimble. New tags for IFC classes and better recognition streamline organization and reporting, making it a boon for BIM (Building Information Modeling) workflows. Whether you’re coordinating with Revit users or other platforms, this update minimizes data loss and rework, keeping your projects on track.
6. AI-Powered Textures: Creativity Unleashed
Building on the SketchUp Diffusion project from Labs, SketchUp 2025 integrates generative AI into the material tray. If the 3D Warehouse doesn’t have the exact texture you need, you can start with a similar material, hit the AI button, and let it create a custom PBR texture for you. It can even fix pattern alignment issues. While these materials don’t yet map directly to V-Ray 7 (a note for Studio users), this feature opens up endless possibilities for quick, creative experimentation.
7. Workflow Boosters: Little Changes, Big Impact
Beyond the headline features, SketchUp 2025 includes practical updates to keep your workflow humming:
- Extension Migrator: Seamlessly transfer plugins from previous versions to 2025.
- Live Models: Link imported models to their source files, so updates to one instance (like changing a chair’s color) reflect across all instances in your project.
- Windows Installer Redesign: A simpler setup process for desktop users.
- Enterprise Controls: Admins can now disable Diffusion for enterprise accounts, offering more control over AI features.
What’s Missing?
While SketchUp 2025 delivers a lot, some users might notice the removal of Style Builder from desktop editions—a niche tool for custom line styles that’s no longer included. And for V-Ray users, the lack of direct material mapping from SketchUp’s PBR to V-Ray 7 might mean extra steps in your rendering pipeline. Still, these are minor trade-offs in an otherwise robust update.
Why It Matters
SketchUp 2025 isn’t just about flashy visuals (though those are impressive). It’s about doing more with less—less time, less effort, and less rework. The focus on photorealistic visualization, curated content, and interoperability reflects Trimble’s commitment to keeping SketchUp relevant in a fast-evolving design landscape. Whether you’re mocking up a quick concept or delivering a polished client presentation, these tools help you tell a richer story.
Ready to Dive In?
SketchUp 2025 is available now for Go, Pro, and Studio subscribers. If you’re already on board, update via your Trimble account to start exploring. Not a subscriber? You can test drive it with a free trial. Head over to the SketchUp website, check out the release notes, or join their March 11 webinar for a deeper look.
What do you think of SketchUp 2025? Are you excited to play with Photoreal Materials, tweak Live Components, or streamline your IFC imports? Drop your thoughts below—I’d love to hear how these updates fit into your workflow!

.jpg)


.png)
